PHP display data, update and delete from database MySQL

DISPLAYING DATA

Create file named contact-list.php and the put these code :


Note : fetch_all(MYSQLI_ASSOC) = Fetch or display all data according on database column table's name see documentation.


UPDATE OR ALTER DATA

After displaying data from database, now back to contact-list.php and add some table column :


Note : num_rows = to count all records data on database.


Now create file to be filed by form to alter data, just copy contact_form.php (see on previous article) to make easier and then rename it into contact_edit_form.php.


$_GET = to get data from URL according on variable.


Copy contact-form-save.php(see on previous article) and then paste it with name contact-edit-save.php. and alter some code like these :


Now try to change for example name, change into your name or whatever :


Open your contact-list.php on browser and see if your data has changed :


DELETE DATA
To delete data from database create file contact_delete.php like these code :


After you create file contact_delete.php now open contact-list.php and then add delete column and link code


We put some javascript to avoid if user click on wrong data. And then now try to delete your data


And if successful it would be :


Now back to contact-list.php and see if data my_column_2 (id = 2) has deleted.


Finally you can insert, display, update and delete your data from database using PHP. If you want to get more information, syntax and code about PHP you can visit php.net.

Customize localhost or 127.0.01 with your own name


To customizing localhost with your own domain name you need to :
Go to C:\Windows\System32\Drivers\etc\hosts.


Copy hosts file and paste anywhere outside windows folder (better outside folder where is windows installed) and then open hosts file with notepad and you will find 127.0.0.1 localhost like this :


And then fill 127.0.0.1 with your own name, for example :


After modified it, copy it and paste back into hosts file(C:\Windows\System32\Drivers\etc\hosts), so you will replace it with modified file. Turn on or restart your apache server and then open your browser then type according on the name of your apache server content and see the result :


You can custom your domain localhost with another name with the same way.

Insert Database MySQL with PHP form.

INSERT DATABASE MYSQL WITH PHP FORM

After installed PHP , MySQL and phpmyadmin now you must try how to insert database
through PHP as API. It's a basic for web programmer to create form for user login , sign up, make comments and other user's activity on your website.

First create php form using HTML form assume it named contact_form.php and put it into htdocs folder on apache server.
Note : I assume you had understood about HTML5 and  CSS/CSS3.


Then open you browser and then type 127.0.0.1/contact_form.php and it will shown like this :

Create connect_db.php file to connect between PHP and MySQL :


After create the form now you should make the form work, then create contact-form-save.php.


Before you fill and submit your form, open your phpmyadmin and then see your previous table data on table my_table_1

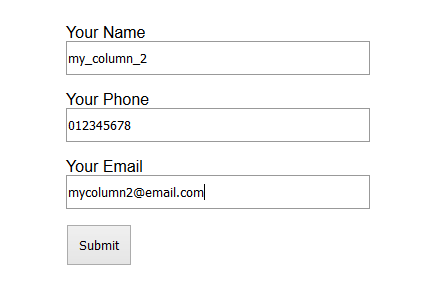
Now we will fill it through PHP form :


And if you successful to insert your data into database the result will be like this :


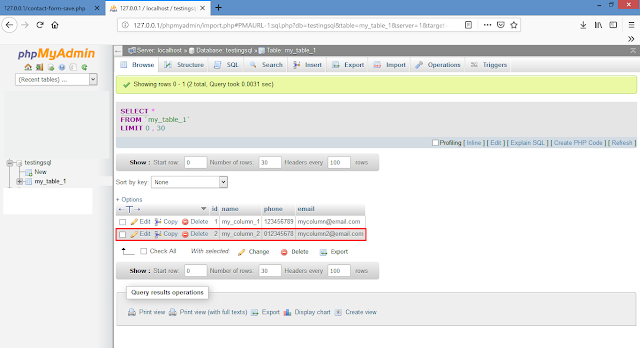
If you open your phpmyadmin there is new record on your table :


CREATE SIMPLE FORM VALIDATION

To avoid invalid data come into our database, we need to make filter / form validation,
back to your code (contact-form-save.php) and then use this code :


Now open contact_form.php (127.0.0.1/contact_form.php) leave it all inputs blank and then click submit here the result:


MAKE DYNAMIC FORM

Usually user won't spent their time to back into page form to make correction on incorrect form, so you need to make dynamic form so that when there is error user doesn't need to back into page form.

First back into contact_form.php and then add these codes on each label like these :


And on contact-form-save.php update your code like these :


- include : to put another file in current page so that can be use / displayed other file on current page.
- global : sign / key to make your variable can be use to entire the part of file.
- $_POST : to take value from input according on name.

other documentation you can see on : https://www.w3schools.com/php/

Now, if you leave entire columns blank or one of it blank it will result :


or like this :


Next article I will show you how to display data from database, update and delete.

Configuring apache server and Install PHP on apache server

Configuring apache server and install PHP on apache server.

First you need to download php from php.net
We use php 7 version when we made this tutorial, because that was latest version of php.
Our php version is 7.2.17.

After download php, extract it from zip and then rename it into php7 
to make easier when connect to apache server. Move it into C:\\Program Files.


Before we start to install and configure php, we need to configure some apache server settings.

Go to your apache folder and then open folder conf :


And then open httpd.conf, don't forget to turn off your apache server if it running to avoid file cannot be edit.

First go to ServerName and uncomment and then change the value to localhost :


After change the value of ServerName go to <IfModule mime_module> on httpd.conf and paste this code on line before </IfModule> :


And then go to last line of httpd.conf and paste this code to connect php.ini to apache server


Now we will install php on apache server.

Open folder php7 and look for php.ini-development


Rename it into php.ini and find doc_root and fill it according on your apache server location.


Uncomment extension_dir and fill it according on folder ext location on php7


Go to file upload and uncomment upload_tmp_dir and then fill it with apache's directory upload path.


Go to Fopen wrappers and then change allow_url_include from off to on.

Now go Dynamic Extensions and here you must uncomment these extension to make your php run correctly :
- extension=curl
- extension=gd2
- extension=mbstring
- extension=exif
- extension=mysqli
- extension=openssl
- extension=pdo_mysql
- extension=xmlrpc
- extension=xsl
Uncomment session.save_path and then fill with your apache session folder location. 
This process allow you to store your session when you need to use session, whether for login, or store another session.


Turn on your apache server ON and then create file phpinfo.php like this : 

And save it into folder htdocs (on server apache).


Open your browser and type http://127.0.0.1/phpinfo.php on url address bar, and it will shown :

Now you has finished tutorial how to install and configure php on apache server, on next article 
we will show you how to install and configure mysql database and phpmyadmin.

Installation and configure phpmyadmin

Installation and configure phpmyadmin on apache server.

On this documentation we use phpMyAdmin-4.0.10.16 you can download it here : https://www.phpmyadmin.net.


After download you need to extract it on folder htdocs on apache server rename it into phpmyadmin and then open your browser and type : 127.0.0.1/phpmyadminmake sure if your mysql server is running.

This is the image when you open it on browser:


Before use it, you need to configuring some config to avoid error, open your phpmyadmin folder and then find a file : config.sampple.inc, rename it into config.inc.


Fill your settings according on this table :


$cfg['blowfish_secret'] = 'abcdefg' // fill this by yourself.

Find User used to manipulate with storage and then set like this :


$cfg['Servers'][$i]['controluser'] = 'your_apache_username'; // fill by your apache username
$cfg['Servers'][$i]['controlpass'] = 'your_mysql_password'; // fill by your mysql password

Next, create folder tmp inside phpmyadmin folder and then create both of folder upload and save inside tmp,
and then find : Directories for saving/loading files from server

Fill this settings like this :


Now you can try to create table and delete table on your mysql database.

To create database table, you should  fill your table's name and then fill how many columns as your need, and then click Go :


Fill the columns, then click save:


To insert database just click insert and then fill your data and click Go:
Note : if your primary ID (id) set as AUTO INCREMENT, Just leave it blank.


Note : let ignore be checked if you don't want to fill next column.

Here's the result :


If you want to delete just click on delete to delete data, to drop / remove database first click on Server:localhost :


And click databases then just check which database you want to delete / drop and then click drop on right corner bottom.


That's it, if you find a problem to drop database like message can't rmdir your database, go to this article to solve your problem.

On the next documentation I will make documentation how to implementation php to insert into database using PHP form.

How to fix error dropping database (can't rmdir database)

How to fix Error Dropping database (can't rmdir 'database name') or 'cannot drop database' on MySQL.

Sometimes there is case when we tried to using command drop database to delete database is not working, it could be result like this :


so this documentation contains how to drop / delete database manually if you cannot drop / delete database through command.

Note : error on image above occurred on phpmyadmin.

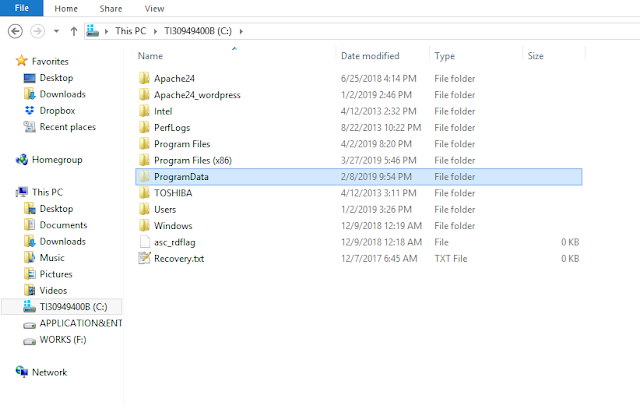
First you need to display hidden items on windows view, and then go to C:"Program Data"


select MySQL folder then select MySQL Server(the version depend on your MySQL installed version)


Select folder data and you will find all of your database, choose database which you want to drop and then delete it. Afterward you can try to create database with same name with command CREATE DATABASE your database

On next documentation I will show how install and configure phpmyadmin

Installing MySQL database.

Installing MySQL database.

Before we start, you need to download mysql database dev.mysql.com.
We used mysql-installer-community-5.7.25.0.msi in this documentation.

If you installing mysql 5.7 version usually you need to download and install .net framework 4.5.2 (This is optional, if it ask you to install it) you can download it here : https://www.microsoft.com


After downloaded open it and it would display :


Choose what you need to install, these all options were we choose :


Fill your password,


Note : please try to remember the password or you need to reinstall it again.

Click next and then click execute to install all of components and plugins, if you has successful install your mysql server it would display like this :


Now after successful installed MySQL server you should test whether it able to run or not.

Open your MySQL Command Clients (you can search it on all program on windows 7 or below)


Fill the password that created by you on previously, if your password is correct it would display like this :


Now testing by put command show databases; then it would show to you all of the databases :


Try to create database, to create database we will use mysql command line client, type code like these :

After you execute this code and then type command show databases; again and you would see testingsql on database.


Now you had successful to install mysql database. On the next article I will show you how to connect it with phpmyadmin, But before continue to phpmyadmin there is small article about how to fix if you got trouble on mysql database, you can skip it , if you don't need it.

Buy me a coffeeBuy me a coffee